
|
For Grave Goods, one of the objects I
wanted to create was an urn for cremated ashes.
Originally I had two overall concepts. One would be a bowl shape forged out of a single iron bloom. My inspiration here was the sculptural work of Lee Sauder, perhaps the only artisan (in North America certainly) working consistently with bloomery iron. I wanted to have the solid metal cleaned and roughly polished in the centre, but the fragmented edges of the bloom would remain along the edges of the bowl to show its genesis in the smelter. I had intended on having a glass artist (likely Kathyrn Thomson) creating a blown glass lid to match the irregular contours of the forged bowl and act as a cover. Time constraints and the raw scale of working a 3 - 5 kg mass of iron made me shelve the project (at least for now). An echo of what I was imagining can be seen in the smaller piece I did in September 'Offering Bowl' |
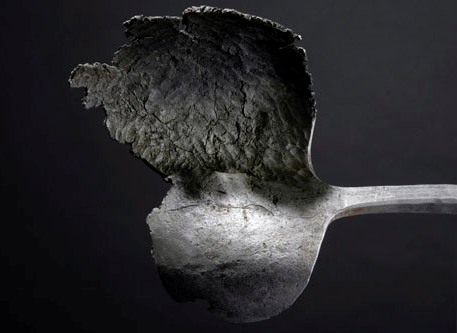 Detail of Tension Deficit by Lee Sauder |
 |
 |
|
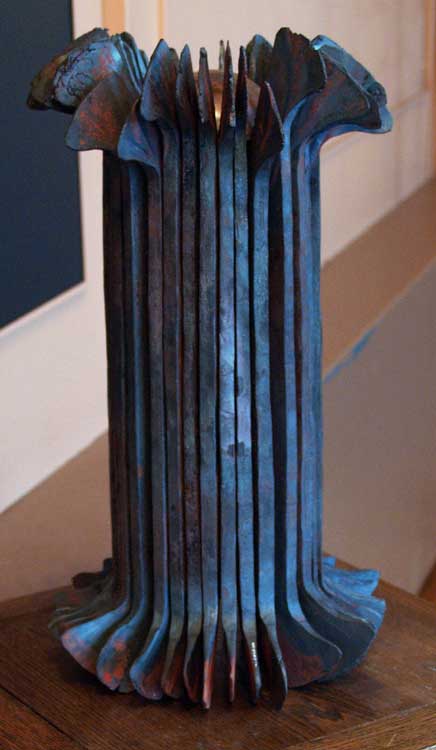
'Segmented Urn'
forged and fabricated wrought iron forged copper sheet Fall - 2008 this object available - $1200 |
" The body of the urn is
composed of a number of individually hand forged strips of
antique wrought iron. I saw samples of the basic technique
employed by the Japanese blacksmith Takayoshi Komine at a
workshop / demonstration two summers past. (Taka uses the
method to make subtle oil lamps employed in the Tea
Ceremony.) Actual historic wrought iron has been chosen
for the construction because of its excellent forging
characteristics and special durability. The metal itself
is already some 150 years old — and should easily endure
for centuries more. A fitting resting place for the
memories of one past beyond us. " (from the catalogue description for 'Grave Goods') |
 |
In the creation of 'Segmented Urn' I wanted a massive
object, the raw weight and scale conveying durability. As
finished, the piece weighs 17 kg (thats almost 40 lbs). It
stands 38 cm tall and is about 23 cm wide (15 x 9 inches).
The inner volume is a cylinder roughly 25 cm tall by 10 cm
diameter (10 x 4 inches). As the short description from the exhibit catalogue states, the material is antique wrought iron, most of the bars from a bridge originally constructed in Ohio during the 1860's. Some additional elements were forged down from retaining pins that were salvaged from a log barn that was the original homestead from my brothers property near Buckhorn Ontario (most likely 1850's). Besides the special durability of wrought iron (it corrodes much slower than modern steels), I specifically wanted to highlight the textural differences within this historic metal. For that reason, I quite specifically chose not to re-weld any developing cracks as the metal was forged down from the source bars. The two ends of the bars were aggressively flattened to produce de-lamination lines intentionally. This was also the reason a number of rods from the barn were included, as this material was a lower quality iron that I knew would start to fracture as it was worked |
 |
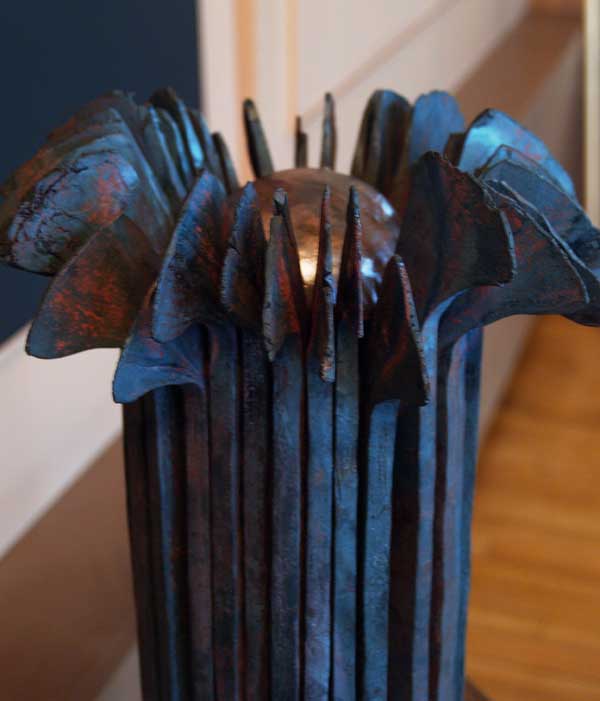
One thing that is invisible in the creation of the object
is the huge amount of work required in forging each of the
34 individual uprights which make up the body. These started
as long lengths (typically 60 plus cm / 24 inches) of cm
(3/4) diameter round rod. This was forged out (admittedly
using my air hammer!) to the 6 x 25 mm (1/4 x 1 inch) flat
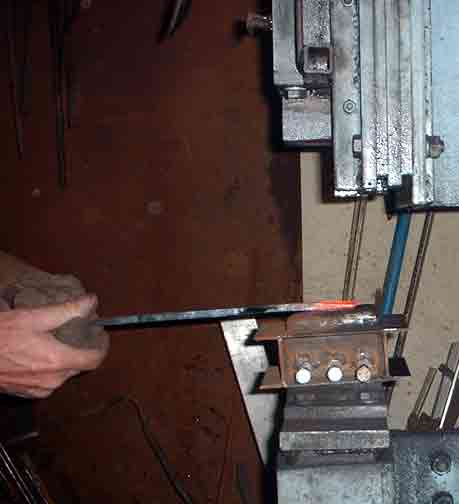
stock required for each element. I then flattened both end of the bars using a special 'Hoffy' style crown die I made for the hammer. The last step was bending the flattened ends down to about a 60 degree angle. |
 |
The Taka technique mentioned in the description involves carefully MIG welding the edges of a stack of separate flat bars, then very gently forging them into three dimensional contours. For Segmented Urn, I made up a special jig that let me set the rough angle between pairs of the uprights. Next the pairs were welded to groups of 4, two groups welded to create rough quarter sections, then pairs welded to produce half sections. At this point it was found that an additional set of two would be required to produce an even full circle, and two more bars were forged and welded to place. I was actually quite surprised just how close together the two half sections were to a close fit. Consider the variation between individual elements, and correctly judging all those angles between the 34 pieces! One weld was made to joint one side of the two half sections. |
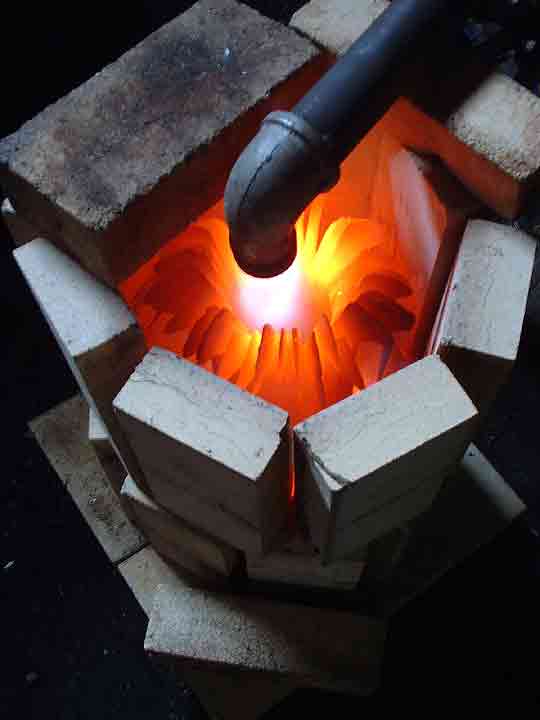 |
To correctly fit the other edge of the two sections, it
would prove necessary to heat the entire bundle (all 17 kg
worth!) up to a forging temperature. This was accomplished
by building a fire brick chamber and using one of my larger
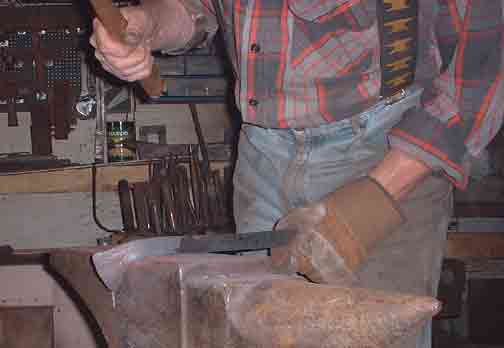
propane burners to make a special custom forge. It took a good half hour to bring the entire mass up to an orange heat. With some effort, the bundle was placed on the anvil, then tapped with a wooden mallet to adjust the alignment along the last edge. I decided to leave the piece to air cool just sitting on the anvil face. As I turned away, the whole piece slowly rolled off the anvil and seemingly in slow motion, dropped to the earth floor of the workshop. Given that it was still at a read heat, and considering the huge mass involved, it was no surprise that the relatively even cylinder now was flattened on one side! At this point I just wanted to finish the project, so the next day I welded up the final seam. Fortunately, other projects (like getting the artists ready for the exhibit) intervened, so I had several days away from finishing the urn. On returning to the work, I decided anything worth doing was worth doing well. So I set up the brick heating chamber again, and waited until the whole piece had once again reached forging temperatures. It proved possible to work over the surface with the mallet and return the overall shape to closer to an even cylinder. |
|
Next I cut a disk out of heavy sheet (3mm / 1/8 inch)
and welded it in place up inside the lower part of the
cylinder. As a lid for the urn I took a piece of 1/4 inch
(7 mm) thick copper I had been saving and cut it into a
rough octagon. This was then forged to dish and raise the
flat plate into a slightly irregular hemisphere. This was
then adjusted to produce a tight fit inside the upper edge
of the cylinder, snug enough that it can be tapped into
place with a rubber mallet. |
