On Buying an
Anvil
Originally published as a GeoCities blog post - October 2002
Originally published as a GeoCities blog post - October 2002
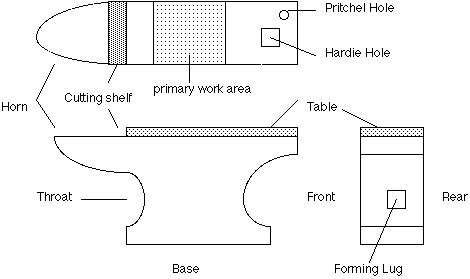
Table - The top working surface.
Base - The lower surface.
Horn - The long 'conical' point.
Cutting Shelf - Just forward of Table at base of Horn
Tail - The square end opposite the Horn.
Throat - The narrow section of the base.
Hardie Hole - The square hole in theTable towards the Tail.
Pitchel Hole - The round hole near the Hardie Hole.
Anvils are all (traditionally) designed for RIGHT hand use. The normal working possition is with your left hand towards the Horn - your right towards the Tail. This makes the surface closest to your body the Front - the side away from you the Rear.
WEIGHT:
On an older anvil, the wieght will be indicated by numbers * stamped into * the rear of the anvil, in the area of the throat.
There should be three numbers (again older anvils). These will be in HUNDRED WIEGHT (at 112 lbs) / QUARTERS (at 28 lbs) / POUNDS. Typical numbers are 1 / 2 / 12 . Run the math to get the total wieght: (1 x 112) + (2 x 28) + 12 = 180 lbs.
Anvils tend to come in size ranges : 100 / 175 / 225 / 350 / 500 lbs.
100 LB - were common on farms after the turn of 1900
175 LB - were typical of local blacksmith shops
225 LB - were typical of carage works or larger smithing opperations
350 LB - were used in small factory operations
500 LB - were used in heavy industury
Running down the sizes, there will be more at the small end, far less at the largest. (for every 225 expect to find 4 at 175 and 8 at 100)
Anvils marked in Kilograms are obviously 'new' manufacture!
HOW BIG?
An anvil BELOW about 100 lbs is not suitable for blacksmithing work. It may be of some use for special purposes, cold sheet forming (armouring), certain types of light sculptural or jewelery forming.
An anvil AT about 100 lbs is suitable for light amateur work - the weekend blacksmith. (Stock sizes up to 1/2")
An anvil at about 175 lbs is the mimium for any kind of serious professional blacksmithing, for example domestic items, hardware, knifemaking, etc. (Stock sizes up to 3/4")
An anvil at about 225 lbs is likely to be required for architectural forge work.
Note: You can always do heavier work on a lighter anvil, but you will find that it will start to 'bounce around' on you.
Always buy the largest anvil you can find - even if you initially plan for lighter work.
Judging the QUALITY:
Older is Better:
Older anvils were made of a forged base, often of wrought iron, with a separate tool steel table that was forge welded on to the top. This gives a stable base that 'gives' slightly with a hard, durable, springy work surface.
Age can be told by:
Use of the traditional wieght measurements.
Generally will have a longer, more graceful horn.
May be thicker through the Throat.
Inclusion of Forming Lugs underneath the Throat on both sides.
"Never buy an American Anvil"
This was traditional wisdom in Canada from the 1850's. With older (forged) anvils, there is usually a serious quality improvement on any anvil that was from England. (German made is also good - but few were imported historically).
Check for this ranking of makers information - which will be stamped into the Rear side of the anvil, above the Throat:
England - then - Shefield
(Note - I expect some AMERICAN blacksmiths will argue this point! My opinion stands with the historic view.)
FORGED over CAST
Generally a forged anvil will be a better working surface for the blacksmith than a cast one. Cast anvils can be determined by:
Seam lines on theBase, running along the Throat, under Horn and Tail.
Wieght and manufacturer's information is raised up off the surface.
More 'modern' anvils are often cast -and the quality can vary considerably (from EXTREMELY bad - to very good). Generally a cast anvil (assuming good quality) will be bouncier, louder, (and in the long run harder on your tendons).
Generally cast anvils tend to have shorter, stubbier (less useful) Horns.
What to LOOK FOR
Table: The Table should be basicly flat and smooth. Obviously no cracks.
There may be some wear - felt by running you hands over the surface, in the area marked 'working area'. This is normal on a long used anvil, and not necessarily a concern. Ideally this wear should not be so much that it is easily seen just looking.
You may be able to distinguish a slight seam line where the table joins to the base. This is not a problem - but any cracks along this line certainly are a danger sign.
The Table should be free of any deep cuts (often formed by miss use with chisels), or other scoring. Note that it may be possible to re finish a marred table by using an angle grinder or even having the surface re-ground by a machine shop with a surface grinder (also used for re-finishing engine blocks).
Edges : The various Edges of the table are unlikely to be sharp and crisp (unless you find a brand new anvil!) It is normal to find a range of differing radius over various points along the edge. Each Blacksmith would file on these curves to suit himself and the way he liked to work. Ideally there should be a small crisp section on both front and rear Edges.
The Edges should NOT have any cracked, split or broken sections. With care and skill, it is possible to repair damaged Edges by building the portion up with a 'hard surface' arc welding rod. Extreme care must be taken when doing this not to damage the correct hardness (heat treating) of the Table.
The Edges should not have any 'mushed over' sections. This shows that the hardness of the table is failing - and that cracking is likely in the near future. If not too extreme, again it is possible to re-dress the Edge with an angle grinder.
Cutting Shelf : Is specifically designed for cutting metal with a chisel. An long used anvil may have a scored surface here - but that is not a flaw.
Horn : The Horn should flow to a long tapering point (not mushed over at the end). The shape should be even and smooth - with no obvious distorted or mushed in sections. (Often an anvil used to cold hammer horse shoes into shape will have a mushed section on the rear side, about 1/3 of the way from Table to point - this is not ideal.) Again slight distortions, surface flaws can be ground out.
Note: The longer and more graceful the horn, the more use it will be in forming small and tight curves in decorative work.
Hardie Hole : Ideally the area around the edge of the Hardy Hole should be both square and crisp. The cleaner that area is - the more securely your accessory tools will be held in the anvil.
`The size of the Hardie Hole varies in proportion to the size of the anvil. Unfortuneately, there is no standardization here - with each manufacturer using its own set of sizes over the range. (In other words your Hardie tools from one anvil often do no fit into another anvil the same size if from a different manutacturer!)
Pritchel Hole : As with the Hardie Hole, the area around this round hole (used for punching) should be crisp and flat. Often repeated 'missing the hole' will either chip or wear away this area. This will make hot punching holes, drifting, more difficult.
What to LISTEN FOR
Place the anvil on a piece of wood (the stub or even a piece of lumber).
If possible remove any tie down straps, chains.
Remove any accessory tools, magnets.
Take a LIGHT hammer and gently TAP the surface - basicly just drop the hammer under its own wieght from a distance of 4 - 6 inches.
- As you move the hammer over the surface of the table, in the Primary Work Area, there should be little to no variation in sound. There should be little to no change in bounce.
IF: The sound becomes a 'click' and there is no bounce.
THEN: There is a flaw at the weld between the Table and the Base.
This is an unrepearable flaw.
IF: The sound changes pitch
THEN: The hardness (heat treatment) on the Table is failing
More work will result in a crack described above.
Note that you can expect the pitch to rise as you tap past the Hardie Hole on the Tail.
IDEALLY - the sound produced should be a high pitch, clean, long persisting, ring. The higher the note - the harder the Table surface. The longer the ring - the more even the heat treating from Table into Base.
What is it WORTH:
- Anvil prices vary on availability inside the region. For this reason prices can vary
considerably depending on just where you are looking.
- Anvils are basicly antiques - and for that reason they are constantly increasing
in value over the years.
- Anvils are sought after by new Blacksmith's. As the popularity of blacksmithing as
a hobby has increased from the 1990's to today the 'demand' prices have increased
as well.
- Anvils can vary considerably based on manufacturer, size, and overall condition.
Right now, 'current fair price' for an anvil large enought for blacksmithing work, in reasonable working condition : expect about $2 per lb (CDN)
When I started smithing in the late 1970's, at farm auctions in the same region (100 + km outside of Toronto) 'current fair price' was figured to be $1 per lb. Prices have been increasing generally about 10 - 15% each year. At the same time, availability has decreased as there have been more hobby smiths start up.
I have noticed that often LARGER anvils will actually end up costing LESS * per pound * at auctions. The price 'each' for anvils seems to run from about $250 - 300 for 100 + size range, about $400- 450 for 175+ range. Often the 225+ range also go for the same $400! (Hint - buy the larger one!)
SInce prices are constantly increasing and availablilty is constantly being reduced - a good piece of traditional advice still holds:
BUY THE BEST ANVIL YOU CAN FIND!
At any time into the future you will be able to sell it for at least what you paid for it.

Other COMMENTARIES
(Content now on the main Wareham Forge site.)
Defining the Artist Blacksmith
A commentary on Terminology and Tradition Originally on the Ontario Artist Blacksmith Association web site. |
"Will you take an Apprentice?" A commentary on the reality of the single person studio Originally Seen on my blog Hammered Out Bits |
A
Career as an Artist Blacksmith? Considering a Life as an Artist A short article originally published on the Squido web series . |
Teens as Students?
Some wisdom on the physical demands - and hazards, of working in as a blacksmith. |
From my original GeoCities blog |